Getting Started
This example can be found on SeaORM + Seaography Example.
To get started, all you need is a live SQL database with schema. You can code everything in Rust by writing SeaORM migrations, or design the schema with a GUI tool (e.g. DataGrip).
Install Seaography CLI
cargo install seaography-cli@^1.1.0
Generate Seaography Entities
sea-orm-cli generate entity --output-dir graphql/src/entities --seaography
Generate entities with sea-orm-cli like you normally do, but with an additional --seaography flag. The entities are basically good-old SeaORM entities, but with an additional RelatedEntity enum.
use sea_orm::entity::prelude::*;

#[derive(Clone, Debug, PartialEq, DeriveEntityModel, Eq)]
#[sea_orm(table_name = "cake")]
pub struct Model {
    #[sea_orm(primary_key)]
    pub id: i32,
    pub name: String,
    #[sea_orm(column_type = "Decimal(Some((16, 4)))")]
    pub price: Decimal,
    pub bakery_id: i32,
    pub gluten_free: i8,
}

#[derive(Copy, Clone, Debug, EnumIter, DeriveRelation)]
pub enum Relation {
    #[sea_orm(
        belongs_to = "super::bakery::Entity",
        from = "Column::BakeryId",
        to = "super::bakery::Column::Id",
        on_update = "Cascade",
        on_delete = "Cascade"
    )]
    Bakery,
    #[sea_orm(has_many = "super::cake_baker::Entity")]
    CakeBaker,
}

impl Related<super::bakery::Entity> for Entity {
    fn to() -> RelationDef {
        Relation::Bakery.def()
    }
}

impl Related<super::cake_baker::Entity> for Entity {
    fn to() -> RelationDef {
        Relation::CakeBaker.def()
    }
}

impl Related<super::baker::Entity> for Entity {
    fn to() -> RelationDef {
        super::cake_baker::Relation::Baker.def()
    }
    fn via() -> Option<RelationDef> {
        Some(super::cake_baker::Relation::Cake.def().rev())
    }
}

impl ActiveModelBehavior for ActiveModel {}

// Additional schema meta exposed to Seaography
+ #[derive(Copy, Clone, Debug, EnumIter, DeriveRelatedEntity)]
+ pub enum RelatedEntity {
+     #[sea_orm(entity = "super::bakery::Entity")]
+     Bakery,
+     #[sea_orm(entity = "super::cake_baker::Entity")]
+     CakeBaker,
+     #[sea_orm(entity = "super::baker::Entity")]
+     Baker,
+ }
Generate GraphQL Project
Generating a fresh project is the easiest way to launch a GraphQL server. However, Seaography can easily be integrated to an existing web server built with any web framework.
Seaography supports Actix, Poem and Axum out of the box.
Run the following command:
seaography-cli graphql graphql/src/entities $DATABASE_URL sea-orm-seaography-example
Full help:
🧭 A dynamic GraphQL framework for SeaORM

Usage: seaography-cli [OPTIONS] <DESTINATION> <ENTITIES> <DATABASE_URL> <CRATE_NAME>

Arguments:
  <DESTINATION>   Project destination folder
  <ENTITIES>      SeaORM entities folder
  <DATABASE_URL>  Database URL to write in .env
  <CRATE_NAME>    Crate name for generated project

Options:
  -f, --framework <FRAMEWORK>
          Which web framework to use [default: poem] [possible values: actix, poem, axum]
      --depth-limit <DEPTH_LIMIT>
          GraphQL depth limit
      --complexity-limit <COMPLEXITY_LIMIT>
          GraphQL complexity limit
  -h, --help
          Print help
  -V, --version
          Print version
Start the server
cd graphql
cargo run
You are of course free to modify the project to suit your needs.
The interesting bit starts at the seaography::register_entities! macro in query_root.rs.
You can add custom entities, queries and mutations to the GraphQL schema.
Run some queries
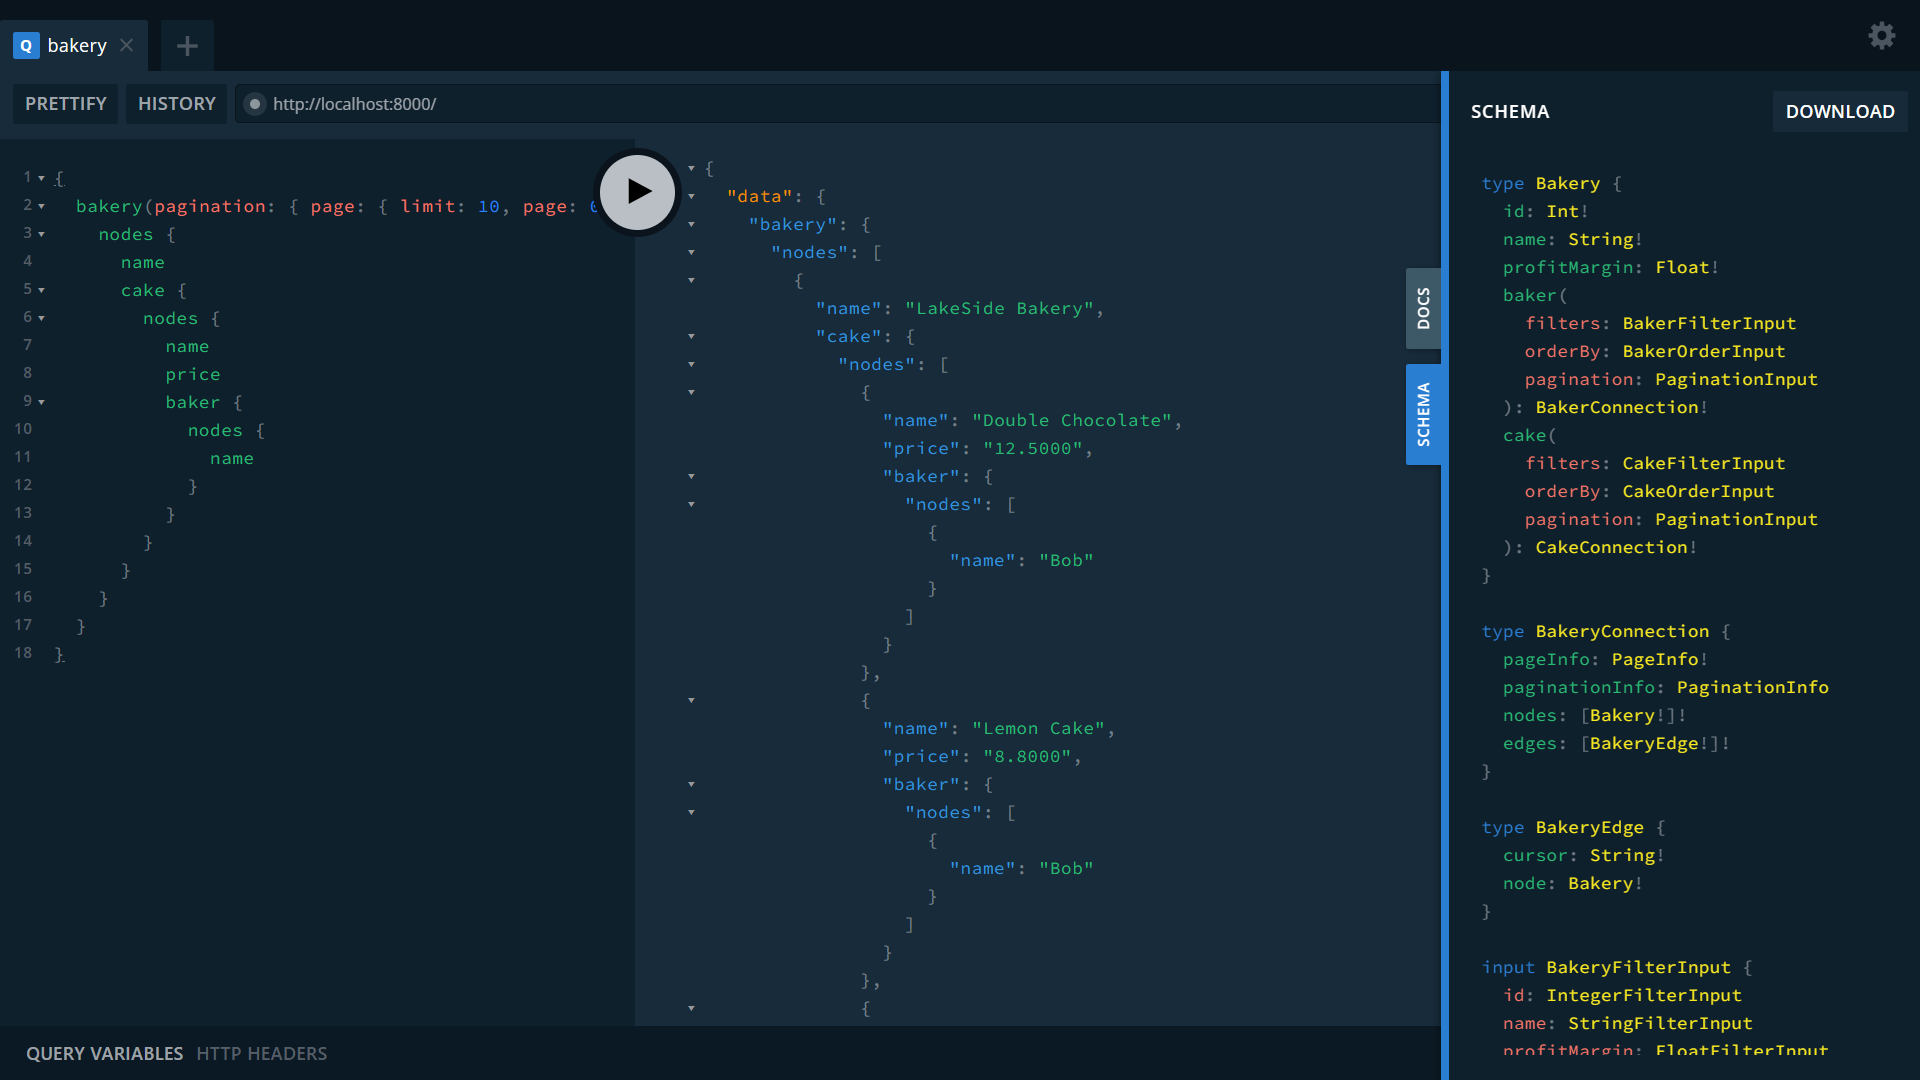
Visit GraphQL Playground at http://localhost:8000
Navigate to the GraphQL Playground, and then start running some queries!
Bakery -> Cake -> Baker
{
  bakery(pagination: { page: { limit: 10, page: 0 } }, orderBy: { name: ASC }) {
    nodes {
      name
      cake {
        nodes {
          name
          price
          baker {
            nodes {
              name
            }
          }
        }
      }
    }
  }
}
List gluten-free cakes and know where to buy them
{
  cake(filters: { glutenFree: { eq: 1 } }) {
    nodes {
      name
      price
      glutenFree
      bakery {
        name
      }
    }
  }
}